This week it has really started to to get cold and dark, and my urge to knit lots of nice winter things has definitely kicked in. It's also the time of year to get going on knitted Christmas pressies too. Can't post the pics or the recipients might see (I'm bursting to tell already, this is going to be hard!). That's my excuse for a few months of sparse knitting posts anyway.
I came across an interesting technique while I was getting ready to start new projects - something I think Andy will particularly like ;) It's all about how to knit in the round without double pointed needles. Circular needles are good if you're doing a round project with a larger diameter (like the body of the SKB), but for smaller stuff like hats and sleeves and beginning at the center of a flat circle, you'd usually start on several double pointed needles. Well I have discovered some funky alternative methods with circular needles that allow you to do small diameter projects without having to buy a set of matching double pointeds. I don't think I'd like to do a whole sleeve or hat like this, but it's an excellent way of getting started on something that starts small later progresses to circular needles.
It's one of those things that would sound very complicated written down, but it's actually not too bad. Have a look at these v handy vids to get the idea, I'm having a go at 'magic loop knitting' right now!...
Friday 28 September 2007
Wednesday 26 September 2007
Extreme sugar art

Oh my goodness, look at this dessert from Habeas Brulee! Amazing! Bubbles of caramel actually blown like glass, then yummy cardamom/lemon custard piped inside through a tiny hole. Looks very tricky indeed, but definitely one to impress. I sense an impending weekend of burnt fingers and sticky sugar strands all over the kitchen and all over me. Now where can I get my hands on a good metal tube...
Tuesday 25 September 2007
Profiteroles recipe
Choux pastry is fairly quick and easy, and leaves you with lovely puffed up hollow shapes for filling with tasty stuff. A quick poll of my French colleagues at work taught me that the traditional filling for profiteroles is ice cream (with hot choc sauce on top). I’d heard of this before but didn’t realise it was the ‘proper’ filling. Not wishing to disappear off into the kitchen to do last minute ice cream filling after the main course when Eris and Iain were here, I decided to opt for a crème patissiere filling instead which can be made in advance. It’s a good carrier for other flavours too, and this time I made this batch with 2tbsp strong coffee.
Crème patissiere:
5 egg yolks
140g sugar
450ml milk
80g sifted plain flour
knob of butter
Extra flavourings can be included once cooked for example vanilla, coffee essence, liqueurs, lemon, orange etc etc
Bring the milk to the boil in a pan. Beat the sugar and yolks for 2-3mins until pale and slightly thickened. Beat in the flour, and then pour on the milk gradually to incorporate it. Return to a clean pan and bring to the boil, whisking constantly for a few minutes until thickened. Remove from heat, beat in the butter and transfer to a clean bowl. Allow to cool with the surface in contact with a sheet of cling film to prevent a skin forming.
This mixture will keep in the fridge for a few days.
Choux pastry (serves 5-6 generously):
200ml Water
75g butter
pinch salt
100g Plain flour
3 eggs
Chocolate sauce:
200g dark chocolate
250ml double cream
Heat the water, salt and butter in a pan until butter is melted. Bring to the boil and remove from the heat. Immediately beat in the flour until the mixture is smooth and comes away from the sides of the pan. Allow to cool for a few minutes then gradually beat in the eggs bit by bit. The mixture should remain stiff enough to hold its shape when piped onto a baking sheet so you might not need absolutely all the egg.
Run the greased baking trays briefly under the tap so that they have small drips of water on them – the steam helps the pastry to crisp up in the oven. Spoon the dough into a piping bag and pipe into blobs for profiteroles (about the size of a walnut), or sausage shapes for éclairs. Leave plenty of space between them for expansion. Bake at 200 for 10 minutes and then turn up the temperature to 220 for another 15 minutes or so, until the profiteroles are crisp and golden brown. Slit them open whilst still hot in order to let the steam out otherwise they’ll go soggy as they cool.
Just before serving fill the profiteroles with crème patissiere and make the chocolate sauce: Heat the cream until it reaches boiling point and pour it over the chocolate broken into small pieces in a bowl. Allow to sit for 5 minutes while the profiteroles are being filled. Whisk the chocolate and cream vigorously until smooth and glossy. Arrange the filled profiteroles on a serving dish and cover with warm chocolate sauce. Serve immediately!
Monday 24 September 2007
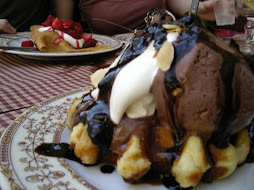
Profiterole revival
I went all retro at the weekend and made profiteroles when we had Eris and Iain over for dinner. We started with an enormous bowl of mussels, then had beef and stout casserole with dumplings (good work Jane!), and then these babies.....

Drool. I finished off the leftovers for breakfast on Sunday I'm not ashamed to say! I've once again failed to have pics, laptop and recipes all in the same place at the same time so recipe to follow, but I thought you might like the squidgy messy chocolatey picture to look at until then :)
SKB latest
The SKB has come on leaps and bounds this weekend - the 'B' of the SKB is finished. It took me more or less 3 weeks to get through the patterened section with beads in it, which was becoming a bit of a slog. 2.25mm bamboo needles are more or less cocktail sticks so it was pretty fiddly, and not at all helped by the fact that I snapped both needles at one point or another so they were a lot shorter and rougher than they could have been!
Anyway, I finished that section by the end of Friday night thankfully, and moved back up to nice 5mm metal needles to storm through the rest. The entire remainder of the body was finished by Sunday night, although I might re-do the bottom ridges on the smaller needles to make them a bit less bulging. Time for the sleeves now, then all that will remain is to knit a few rows around the neckline. Hurrah!
Friday night...

Sunday night...

Wednesday 19 September 2007
Tayside Blueberries
 Although blueberries are native to North America, they grow extremely well in the cool and wet conditions here in Scotland. At the Scottish Crop Research Institute just down the road in Invergowrie they grow lots of soft fruit crop plants for various studies, a happy consequence of which is that there is a bountiful harvest of unwanted fruit! The raspberries are great of course, being what Tayside is famous for, but so are the blueberries - and a bargain at £5 for an entire kilo. According to wikipedia blueberries are one of only a few human foods that are naturally colored blue. I can’t think of any others (unless you count blue cheese). Any suggestions??
And of course they’re super healthy – full of antioxidants, vitamin C etc etc, so even in cheesecake form you can convince yourself it’s all good :)

I realise this is the second cheesecake recipe in a row, I need to improve on getting recipes into blog form, but it’s a good one so bear with me. Takes a while, but the advantage is that it’s made the day before so all you need to do is whip it out of the fridge when people arrive and leave it somewhere conspicuous to be admired!
Lemon and Blueberry Cheesecake

300g shortbread biscuits
675g cream cheese, softened
400g caster sugar
2tsp finely grated lemon zest
35g plain flour
2tbsp cornflour
1tsp vanilla extract
½ tsp salt
6 large eggs
125ml lemon juice
lots of blueberries
Crush the shortbread biscuits and mix with enough melted butter to lightly coat the crumbs (I didn’t weigh what I used, but maybe something like 50-75g). Press into the base and sides of a greased 9in tin and freeze until required.
Beat together the cream cheese, sugar and lemon zest until smooth, then add the flour, cornflour, vanilla extract and salt, beating until well combined.
Add the eggs one by one, then the lemon juice, beating well between additions.
Put the prepared tin on a baking tray and pour in the filling. Sprinkle a few handfuls of blueberries over the filling using varying amounts of force so that they sink to different depths within the mixture.
Bake on the centre shelf at 130 for 1 hour, then at 120 for another hour, then at 100 for a further 1.5h – book says until internal temperature of filling reaches 79oC although I don’t have a temperature probe.
If there’s time, allow the cheesecake to cool to room temperature then refrigerate overnight. Due to the ridiculous length of cooking time and my own lack of planning/time, I usually end up having to stay up late waiting for the cheesecake to finish cooking. Not wanting to stay up a further hour or two waiting for it to cool, I just turn the oven off without opening the door and leave it in there overnight ready to fridge in the morning.

Once cool the top of the cheesecake will look a bit ugly – higher at the edges than in the middle and probably with some cracks and splits in it. To tart it up and make it look more presentable even off the surface by trimming the edges away, then coat with a thin layer of double or sour cream followed by lots of blueberries.
Tuesday 18 September 2007
MRC cake sale


Yesterday we had a cake sale at work for 'diabetes research within the University of Dundee' - ie sell cakes to keep yourself in a job because universities don't have enough money. I'll refrain from ranting about how silly it all seems, and how we should have been raising money for more useful things, but instead here's some nice pictures of lots of cake! First off, some stuff fresh out of the oven on Sunday evening... and the whole lot spread out ready to sell. Thanks to Linda's hard work we raised well over £200. Now which lucky person gets to buy the antibody of their choice with the cash??
Unveiling of the WIP and related eating events
Well done Dr Wingate - we had a very good pre-viva talk on Friday by Andy, followed by just about the shortest examination ever. I think it's got to be close to the record at a speedy 2h30. Nice work. Anyway, I think that means that I'm free to unveil the mystery WIP that I alluded to previously: it's some knitted DNA which formed part of Andy's viva present.

Pattern was drawn from Kimberly Chapman's website (no relation!) which has all sorts of weird and wonderful toys. Link is in list on RHS. For the science nerds among us, an extra personal relevance was added by using a combination of base pairs that spell out Andy's initials when translated into amino acids. Umm, is that too geeky? Time to move on!

Here are a bunch of revellers enjoying roast lamb lunch the day after the viva - while I was at a recorder rehearsal! :( Barry and Elton cooked the remaining joints left over from our lamb beach bbq. Laurence kindly brought me a kilo of very yummy blueberries from the SCRI harvest last week so I made a lemon and blueberry cheesecake for pud. Pics of that will follow when I have the recipe book to hand so I can include the recipe too.
I had some fruit compote left over from making blueberry frozen yoghurt too, so on Sunday morning Jane and I had a very unhealthy but tasty brunch of drop scones with blackcurrant jam (my most successful attempt at jam from Arbuckle's PYO fruit last summer) and the blueberry stuff, which actually kind of almost set into jam after being in the fridge too. And lashings of butter too. Yum! We served these to guests at RC as they arrived for their courses.

Tuesday 11 September 2007
Sourdough
Right then, here’s the first River-Cottage-inspired post: sourdough. I’ve been getting quit interested in bread making recently and had the chance to make some bread from a sourdough culture at RC. Here it is, mmmmm….

It’s a back to basics kind of bread, relying on natural yeast and bacterial cultures present in the flour and air, rather than the addition of bakers yeast (although a sneaky extra sprinkle can help things get going). The basic idea is that you initiate a kind of starter culture by mixing flour and water together and using it to catch and feed organisms that are all around in the air. It can take a few goes to get the ‘right’ culture but it’s pretty obvious by smell – ie if it's bubbly and smells yeasty and bready then it’s good, if it stinks then throw it away!


It’s a back to basics kind of bread, relying on natural yeast and bacterial cultures present in the flour and air, rather than the addition of bakers yeast (although a sneaky extra sprinkle can help things get going). The basic idea is that you initiate a kind of starter culture by mixing flour and water together and using it to catch and feed organisms that are all around in the air. It can take a few goes to get the ‘right’ culture but it’s pretty obvious by smell – ie if it's bubbly and smells yeasty and bready then it’s good, if it stinks then throw it away!
Once up and running the culture is kept alive by feeding with extra water and flour now and again, and it can be kept indefinitely (decades even!!) as a starter for breads, English muffins, waffles, pancakes etc. A quick google search revealed a few interesting websites on the subject, and comments by people who had been given their cultures by friends years and years ago, or been passed down through generations as kind of family heirlooms. Check out some info from S. John Ross for starters, also here's nice sourdough blog and of course wikipedia. There’s plenty of info in the RC Family Cookbook too.
What I did at RC was to mix 2.4L water with 2 kilos flour and a few ladelfulls of the starter culture. The resulting very wet paste was left overnight to form a ‘sponge’, to which 2 more kilos of flour were added the next morning, together with 2% salt. Knead for 10 mins, prove for 40, then bake. Easy! I’m going to have a go and making a starter culture from scratch but I really like the idea of an heirloom one. Anyone got a sneaky bit of starter culture that they’d like to share to begin a west end colony??


Here's a pic taken on the beach at Lyme Regis, a few mins down the hill from the campsite, and also the lovely view of RCHQ taken from the track that everyone walks down after leaving the cars at the top of the hill by the road. Nice.


Monday 10 September 2007
SKB progress
Just back from my week at River Cottage, very tired but it was great. Foody posts and pics to follow but here's an update on the Stitch Diva Simple Knitted Bodice which I was working on during my travels. I've hit the lace/beady section under the bust and it's seriously slow going, especially since I snapped the top inch off the left needle only 3 rows in to the journey to Edinburgh. VERY annoying! Apologies for the strange colours in the pics, it was dark.

It's looking a bit weird at the moment, but I'm liking the top-down method which means you can get a feel for how it's going. I need to do 3 inches of the lacy bit in total, then straight down to the bottom in stocking stitch. Then pick up the stitches of the sleeves and do the lace pannel in the same place, and a bit of a flare towards the bottom.


I read a few different methods for adding the beads to the stitches and wasn't happy with either threading them all on to the ball before starting, or using a crochet hook to pull the stitch through each bead individually, so I've been using a sort of hybrid technique. I threaded a thin needle onto either end of a short bit of cotton and knotted them in place. The stitch to be beaded is passed onto the thread, and then the bead pulled onto the stitch by threading both needles through the hole in the bead and pulling it down onto the stitch. Once beaded, the stitch can be put back on the L needle and knitted as normal. S-L-O-W!
Subscribe to:
Posts (Atom)